
|
Sergey Ivanov,
|
Ivanov, Sergey (2545) - Westerinen, Heikki M J (2390)
Stockholm, 1999, round 4
[D06]
|
The game ran on the 30th of December and was to become the last game of the 1999 year. I wished to finish the year worthy and to play a good and attractive game. Course of the game shows that my partner was overwhelmed with the same feelings. 1. d4 d5 2. c4 c5A very experienced Finnish grandmaster has been upholding this seldom continuation not without success for several last years. Frankly speaking, at home preparation I hadn't managed to find a way to gain a more or less tangible advantage for White. 3. cxd5 Nf6
4. dxc5 Qxd5 5. Qxd5 Nxd5 6. e4
(
6. a3 Nd7 7. b4 a5
For example,
9. Be3
(
9. Bd2 N8c6 10. Bb5 Bxc5 11. Ke2 Ke7!
=,
V.Korchnoi - J.Piket, Antwerpen, 1993)
9...N8a6 10. Bxa6 Nxa6 11. Rc1
Bd7
(
6. Nc3
, with a value of
8...Qxd5
(to keep queens is even worse:
8...Qe7+ 9. Be3 Nc6 10. Bb5
Bd7 11.
15. Rad1! Rd8 16. Bb6 Rxd1 17. Rxd1 f6 18. Qf5 g6 19. Nc7+ Kf7 20. Qd5
1:0, L.Portisch - D.Bronstein, Monte Carlo, 1969)
9. Nxd5 Nba6 10. Bb5+
Bd7 11. Bxd7 Nxd7 12.
Unloading 14...Bc5 didn't help - by drastic 15. Nc7! Rad8 16. Nxa6 Bxe3 17. fxe3 bxa6 18. Rac1 Nb6 19. Rc7+ Kg6 20. Rxd8 Rxd8 21. Rxa7 White won a pawn and the game shortly after. 4...cxd4 5. Qxd4Alternative ways 5. Nxd4 Nxd5 or 5...a6!? see in NIC Yearbook 52, "Sosonko's corner". 5...Qxd5 6. Nc3
That day my opponent evidently didn't want to play a boring ending, which
could appear after
6...Qxd4 7. Nxd4 a6
, and after long thinking he
preferred to continue the struggle with queens. It's not excluded that his
choice was influenced by the result of the recent game A.Kuzmin -
H.Westerinen, Andorra, 1999, where White had showed a fresh idea:
8. g3
(
8. Bg5 Nbd7
[
8...e5 9. Bxf6 gxf6 10. Nc2
15. Rc2 Rfe8 16. Nd2
(now it's time to trade light-square bishops)
16...Bxg2 17. Kxg2 Rac8 18. Rfc1 Nb6 19. a4
Suddenly it turns out that black queen feels itself uncomfortably. Here my partner spent much time again and took an unhappy decision.
Of course,
7...Qb6 8. Qxb6 axb6 9. Bb2
is of little attraction, for
black queenside pawns are very weak. It was necessary to recede to the
opposite side -
7...Qh5
. I remembered that theory advises
8. Ne5!
, preserving the queen from attack
Nc6
, but further my
knowledge stopped. While my opponent was thinking, I studied the most
annoying (to my mind) reply
8...Nfd7!?
(worse is
8...Nbd7
9. f4!?
, or
8...Bd7 9. b5!
, or
8...Nc6 9. Nxc6 bxc6 10. e4 e5
11. Qc4 Bd7 12. Be3 Qg4
(
12...a5!?
,
12...Ng4!?
)
13. a3
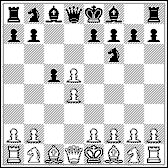
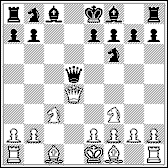
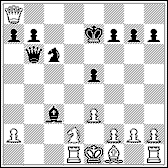
Only after placing this position on a board at home, I realized that it's in favour of White. An "electronic friend" also says that White "has decisive advantage". 8. Qc4!?White put himself to unwarrantable risk. But I wanted very much to keep up the fighting mood of my partner and to play "battle" chess, although I saw that I could gain a quiet ending with an extra pawn by 8. bxa5 exd4
9. Nb5! Bb4+ 10. Bd2 Bxd2+ 11. Nxd2 Nd5 12. Nxd4 Nc6 13. Nxc6 bxc6
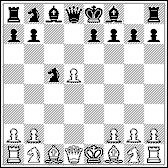
Black has no choice - both
8...Be6? 9. Qxe6+
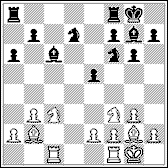
10. Qxb7? would have been a terrible mistake, for after 10...Nbd7 11. Bd2 Bxc3 it is Black who has the decisive attack. 10...Bxc3+ 11. Bd2 Ne4After 11...e4 White has a resource 12. Rc1 . 12. Rd1
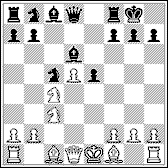
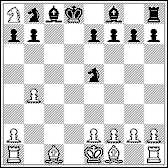
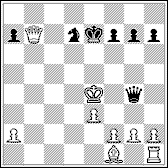
White has defended all his weak points and is ready to start development - e3 , Bd3 etc. Pay attention to the strong position of the queen on h8 - it holds black pieces of the queenside and doesn't let them to enter play. 12...Nc6
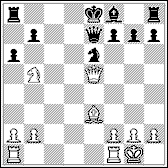
Now White wins forcely. It's easy to win in the case of
12...Bxd2+
13. Nxd2 Nc3 14. Nc4 Qc7 15. Ne3
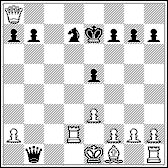
17. Rd1! (it is necessary to empty the square d2 , drawn is 17. Ke2 Qb5+ 18. Kf3? e4+ 19. Kxe4 Nf6+ 20. Kf4 Nh5+ 21. Kf3 Qf5+ 22. Ke2 Nf4+! 23. exf4 Qe4+ with a perpetual check) 17...Qb4+ 18. Ke2 Qb5+ 19. Kf3 e4+ 20. Kxe4 Qe5+! ( 20...Nf6+ 21. Kf4! g5+ 22. Kf3 Qf5+ 23. Ke2 Qb5+ 24. Rd3 Qb2+ 25. Kf3 ) 21. Kd3 ( 21. Kf3 Qf6+ 22. Ke2 Qb2+ ) 21...Qd5+ ( 21...Qb5+ 22. Kc3 Qa5+ 23. Kb3 Qb6+ [ 23...Nc5+ 24. Kc4 ]
24. Bb5! Qxb5+ 25. Kc2
26. f4 f5+ 27. Kd4 Qd1+ 28. Bd3 Qxh1 29. Qb4+ Ke8 30. Bxf5
Now White has no need moves like 15. Bd3 .
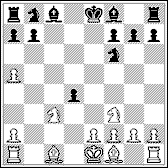
17...Nd4+
with a trap (
18. exd4? Qe4+
=) is refuted by
18. Rxd4 exd4 19. Qc8
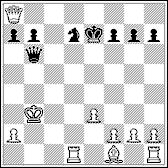
In contrast to the variant with 12...Nd7 , now this move is possible, for Black has no resource Nd7-f6 . Meanwhile, erroneous is 19. Kxe4? Qe5+ 20. Kd3 ( 20. Kf3 Qf5+ 21. Ke2 Qb5+ ) 20...Qd5+ 21. Kc3 Qa5+ , and the white king can't hide from a perpetual. 19...Qb4
Neither
19...Ne5+ 20. Kg3 Nd3 21. h4
The simplest. 20...Ne5+
20...Qxd2 21. Qxb7+ Kd6 22. Rd1
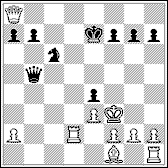
Now it is the black king who appears in a mating net, and his white wis-a-wis takes the very active part in the former's capture. 23...Ke6 24. Rd6+ Kf5 25. Qc8+ Kg5 26. h4+ 1:0Black resigned, not awaiting for 26...Kh5 27. Qf5+ g5 28. Qg5# |
 )
6...Nb4 7. Na3 e5 8. Nf3
f6
promises White no favour, because a pawn
c5
falls a prey of
Black pieces.
)
6...Nb4 7. Na3 e5 8. Nf3
f6
promises White no favour, because a pawn
c5
falls a prey of
Black pieces.

 Rc8
)
12. Nc4
Bxc5!
= 1/2, F.Gheorghiu - H.Westerinen, Liechtenstein, 1998. Not till
coming back to St.Petersburg, I found out in the latest volume of the "New in
Chess Yearbook" (NIC Yearbook, v.52) a paper of Genna Sosonko "Symmetry", in
"Sosonko's corner". The grandmaster offers to play
4. e4! Nxe4 5. dxc5
Nxc5
Rc8
)
12. Nc4
Bxc5!
= 1/2, F.Gheorghiu - H.Westerinen, Liechtenstein, 1998. Not till
coming back to St.Petersburg, I found out in the latest volume of the "New in
Chess Yearbook" (NIC Yearbook, v.52) a paper of Genna Sosonko "Symmetry", in
"Sosonko's corner". The grandmaster offers to play
4. e4! Nxe4 5. dxc5
Nxc5
 Seemingly, this reply is optimal for White,
but
6. Nf3!
is more exact, for
6. Nc3
permits
6...e5!?
7. Nf3 Bd6 8. Nd2
Seemingly, this reply is optimal for White,
but
6. Nf3!
is more exact, for
6. Nc3
permits
6...e5!?
7. Nf3 Bd6 8. Nd2


 ;
8..e6
9. g3
;
8..e6
9. g3

 )
9...Qxe5
(
9...Na6!?
)
10. Qxe5 Nxe5 11. Nc7+ Kd8 12. Nxa8
.
)
9...Qxe5
(
9...Na6!?
)
10. Qxe5 Nxe5 11. Nc7+ Kd8 12. Nxa8
.
 and
8...Qd8? 9. Ng5! Qd7
10. Nxf7!
and
8...Qd8? 9. Ng5! Qd7
10. Nxf7!

|
|
Next game, annotated by S.Ivanov |
|
|
Previous game, annotated by S.Ivanov |