Sergey Ivanov annotates the game
Kasparov, G (2810) - Topalov, V (2700)
[B07]
Wijk aan Zee, 1999
Tactical methods of modern chess
A chess game is unity and harmony of chess strategy and chess tactics, of
strategic planning and tactical operations. Sure, the main task of modern
chess is to unswervingly carry out choosed strategic plans. However, one
should remember about appropriate tactical "additions" and take into account
possible tactical motives and details. For example, it's unsufficient to
carry out deep strategic plan of mobilization and strengthening pieces and
capturing space etc. if after all this, You blunder from a tactical strike
from Your opponent, leading to mate in a few moves, or to an opponent's
decisive material advantage. Every strong chessplayer has to be as good at
tactical strike as in strategy; for a chess master's style he must be
many-sided. Deep understanding of chess tactics is the key to the most
important chess skill - solving hard (sometimes, very hard!) tasks of chess
strategy.
Study of chess tactics should start from the simplest point - from elementary
tactical operations. It's also nesessary to understand reasons of appearance
of tactical motives for combinations, its' elements and means of tactical
impacts on a rival. Further on one could proceed to more complex tactical
operations.
Almost every tactical chess operation is of a complex structure. It consists
of two, three or more elements, which are commonly called
tactical methods
. Though the number of possible
tactical operations is huge, the number of elementary tactical methods and
appropriate tactical ideas is comparatively small. Different chess writers
give different numbers. Well-known Soviet theoretician G.M.Lisytsin in his
work "Strategy and tactics in chess skill" claims, that the number of
elementary tactical methods is as humble as 23.
Here are these tactical methods:
-
Attraction
-
Distraction
-
Removal of defender
-
Crossing
-
Overwork
-
Blockade
-
Square clearance (de-blockade)
-
Zugzwang
-
Intermediate move
-
Counter-strike
-
Mating net
-
Smothered mate
-
Discovered check
-
Pin
-
Last (last but one) rank mate
-
Breaking of king's pawn cover
-
Double attack
-
Passed pawn
-
Half-a-pin
-
Discovered attack
-
Repeating moves
-
Stalemate
-
Positional draw
Usually for illustration of various tactical methods one should collect
different examples from a number of games, played for a long history of
modern chess. But we have the unique possibility to study most of the methods
with only one game from the recent tournament in Wijk aan Zee, where World
champion Garry Kasparov met Bulgarian grandmaster Veselin Topalov.
1.e4 d6 2.d4 Nf6 3.Nc3 g6 4.Be3 Bg7 5.Qd2 c6 6.f3 b5
The first moves have defined plans of both players. White is ready to carry
on his play at the kingside and in the center, and Black - on the queenside.
7.Nge2 Nbd7 8.Bh6
Standart action for such a position. Now, if Black performs kingside
castling, White exchanges dark-square bishops and attacks with his pawns -
g4
,
h4
etc. Black king becomes uncomfortable.
8...Bh6 9.Qh6 Bb7
Black prepares to evacuate his king to the opposite side.
10.a3
Prophylactic! In the case of
10.0-0-0 b4 11.Nb1 Qa5
Black would have
counter-play.
10...e5 11.0-0-0 Qe7 12.Kb1
An important feature. Russians say not without reason, that "long" castling
is long not only for that reason that the rook makes a long transit, but also
because it must be "completed" with the move
Kb1
. Besides of this
useful prophylactic, White plans (expecting queenside Black castling) to
transfer his knight via a route
Ne2-c1-b3
to the
a5
-square.
From here it will exert pressure on the Black's queenside, weakened by pawn
moves. However, this plan looks somewhat slow, and Black has time for
counter-chances.
12...a6 13.Nc1 0-0-0 14.Nb3 ed4 15.Rd4 c5 16.Rd1 Nb6
Black is ready to open play in the center with
d6-d5
and to take the
initiative.
17.g3
White need to finish development of his kingside as soon as possible.
17...Kb8 18.Na5 Ba8 19.Bh3 d5
Players' strategic plans are over. White has set "bridge-head" (knight
a5
!) to attack the bared black king, Black has carried out a pawn blow
in the center. Now concrete tactical play begins.
20.Qf4 Ka7 21.Rhe1 d4
After
21...de4
an even position would have appeared, but Topalov
wanted more.
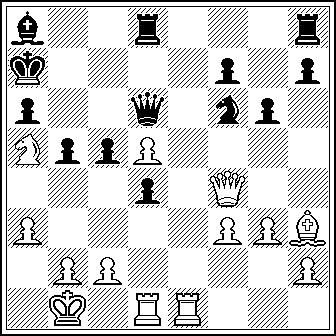
22.Nd5!?
Of course, the knight's retreat would be a refutation of White' strategic
line. Kasparov has noticed, that there are too many weak points around the
black king, producing ideas for various tactical operations.
22...Nbd5
Lost is
22...Bd5? 23.ed5 Qd6 24.Nc6 Ka8 25.Re7+-
, or
22...Nfd5?
23.ed5
(black queen is
overworked
- it
couldn't defend the points
c7
and
f7
simultaneously)
23...Qd6 24.Qf7+-
23.ed5 Qd6

24.Rd4!?
To begin, White undertakes a rook sacrifice, which could be classified as
a
breaking of king's pawn cover
. Kasparov
refused equal ending after
24.Nc6 Bc6 25.Qd6 Rd6 26.dc6 Rc6 27.Re7 Kb6
28.Rf7
.
24...cd4?!
Bad was
24...Qf4 25.Rf4 Nd5 (25...Rd6 26.c4) 26.Rf7+/-
More problems
White would have had after
24...Bd5
. White could fight for advantage
only with
25.Rd5!
-
distraction
and
removal of defender
simultaneously (ending
after
25.Qd6 Rd6 26.Rd3 c4 27.Rde3 Kb6 28.b4
is worse for White,
because his knight
a5
is badly placed).
25...Nd5 (25...Qf4
26.Rd8!
(
intermediate move
)
26...Qc7
27.Rh8 Qa5 28.Re7 Kb6 29.Rf7+-) 26.Qf7 Nc7
(the only move)
27.Re6!?
(27.Re7 Kb6)
Black has two possibilities: A)
27...Rd7 (27...Rdf8)
28.Rd6 Rf7 29.Nc6 Ka8 (29...Kb7? 30.Nd8
(
double attack
)
30...Rd8 31.Rd8
with
idea
Rf3?? 32.Bg2+-
(
pin
))
30.f4
with idea
Bg2
with initiative. B)
27...Qd1 28.Ka2 Rd7
(28...Qd5 29.c4!
(
counter-strike
)
29...Rd7 30.Qf6 Qd2 31.Nc6 Kb7 32.Qh8 Ne6 33.Be6 Kc6 34.Qc8! Rc7 35.Qa6#)
29.Re7 Qd5 (29...Re7 30.Qe7 Kb8 31.Qf6!+-
(
double attack
- on rook
and king, for threatening is mate in two))
30.Qd5 Rd5 31.Rc7 Kb6 32.Rc6
Ka5 33.Bc8!
(
mating net
)
33...Rc8
(33...b4 34.Ra6 Kb5 35.a4 Kc4 36.Be6+-
(
pin
))
34.Rc8+/-
Seems, the best reply for Black is
24...Kb6!
(
counter-strike
).
Knight
a5
is under attack, and Black threats to enter a better ending.
For example, A)
25.b4 Qf4 26.Rf4 Nd5 27.Rf7 cb4 28.ab4 Nb4=/+
B) Let
try to step back -
25.Nb3
. B1) White rook is "mined", as before:
25...cd4? 26.Qd4 Kc7 (26...Kb7 27.Na5 Kb8 28.Re7!+-
- see annotations
to the 25th move of Black)
27.Qa7 Bb7 28.Nc5
. Black again has several
ways, but no one saves him. B1a)
28...Rb8 29.Na6!
(
double
attack
,
pin
,
distraction
and
square clearance
simultaneously!)
29...Qa6
(29...Kd8 30.Nb8+-) 30.Qc5 Bc6 (30...Kd8 31.Qe7#) 31.Re7 Kd8 32.Qd6+-
B1b)
28...Qd5 29.Na6 Kd6 (29...Kc6 30.Nb4+-
(
double attack
))
30.Qb6 Qc6 31.Qd4 Qd5 32.Qf4 Kc6 33.Qc7#
B1c)
28...Qb6 29.Re7 B1c1)
29...Nd7 30.d6!
(
distraction
and
attraction
simultaneously). B1c11)
30...Kd6
31.Rd7!
(
removal of defender
)
31...Kc6 (31...Kc5 32.Rc7 Bc6
33.b4+-) 32.Nb7! Qa7 (32...Rd7 33.Na5! Qa5 34.Qd7 Kb6 35.Qd4
(
double
attack
)
35...Kb7 36.Qh8+-) 33.Nd8
(
discovered attack
)
33...Kb6 34.Ra7 Ka7
35.Nf7+-
B1c12)
30...Kc6 31.Bd7 Rd7 32.Qb6 Kb6 33.Nd7+-
B1c2)
29...Rd7 30.d6
(
attraction
)
30...Qd6 31.Qb7 Kd8 32.Nd7 Ke7
33.Ne5
(
discovered attack
)
33...Ke8 34.Qc8 Qd8 (34...Ke7
35.Nc6+-) 35.Qd8 Kd8 36.Nf7
(
double attack
)
36...Ke7
37.Nh8+-
B2) If Black captures a pawn
d5
with his knight -
25...Nd5
, then after
26.Qf7 (26.Qd6 Rd6=) 26...Rhf8 27.Qg7 cd4
(27...Rg8 28.Qh6+/-) 28.Re6+/-
(
pin
) White wins a queen and gets
advantage. B3) But if Black captures a pawn with his bishop -
25...Bd5
, then White has nothing better than
26.Qd6 Rd6 27.Rd2
Rhd8
with a little bit worse ending. C) As we see from the above
variants, white pawn
d5
(as well as white knight
a5
) plays
important role in the development of White's attack. Couldn't he defend the
pawn, leaving his knight to the mercy of fate? Let consider possible
variations:
25.c4 25...Ka5 (25...cd4? 26.Qd4 Ka5 27.c5+-; 25...Qf4 26.Rf4
Nh5 27.Rf7 Ka5 28.g4
with an unclear position)
26.b4
C1) Now
erroneous is
26...Kb6? 27.bc5 Kc5 28.Qe3!
(threatening is fatal
discovered check
with rook)
28...Kb6
(28...bc4 29.Ka1!) 29.Rf4 Kc7 (29...Kb7 30.Qe7+-) 30.Qa7 Bb7 31.cb5+-
,
and White develops decisive attack. C2) Alas, but after simple
26...cb4
27.c5 Qf4 28.ab4 Ka4
White is short of only one tempo - if his king would
nave stayed on
b2
, then he had
Ra1#
. And now after
29.Rf4
Nd5-+
Black's material advantage is decisive. So, our scrupulous analysis
have shown, that Black was better to refute Rook's sacrifice, and he would
have achieved a better ending. But one could hardly reproach Topalov for this
move, made in conditions of a practical game, because no danger for Black is
immediately evident.
25.Re7!!
A stunning strike! One more rook sacrifice, whose function is only the
distraction
of the Black queen from the defence of the
b6
-square. Immediate
25.Qd4 Qb6 (25...Kb8 26.Re7!) 26.Re7 Nd7
27.Rd7 Rd7 28.Qh8 Bd5!
(
last rank mate
)
would have given White nothing:
29.c4 (29.Bd7?? Qg1#) 29...Be6-/+
25...Kb6
The king has to advance, for lost is
25...Qe7? 26.Qd4 Kb8 27.Qb6 Bb7
28.Nc6 Ka8 29.Qa7#
, or
25...Kb8 26.Qd4 Nd7 (26...Rd7 27.Rd7 Nd7
28.Qh8+-) 27.Bd7
(
zugzwang
!)
27...Bd5
(27...Rhf8 28.Bh3+-) 28.c4!
(
crossing
)
(worse is
28.Nc6 Qc6!
(
counter-strike
)
29.Bc6 Ba2!
(
discovered attack
)
30.Ka2 Rd4 31.Rb7 Kc8 32.Rf7+/=) 28...Qe7
(28...bc4 29.Nc6+-) 29.Qb6 Ka8 30.Qa6 Kb8 31.Qb6 Ka8 32.Bc6! (32.Nc6? Qe1
33.Ka2 Bc4-+) 32...Bc6 33.Nc6+-
26.Qd4 Ka5
After
26...Qc5 27.Qf6 Qd6 (27...Ka5?? 28.b4+-; 27...Rd6?? 28.Qh8+-)
White would have had two ways to support the initiative: A)
28.Rf7
A1)
28...Qf6 29.Rf6 Kc5 (29...Ka5?? 30.b4 Ka4 31.Ra6#) 30.d6 Rd6 31.b4 Kd5
32.c4+/=
A2)
28...Ka5 29.Qc3 b4 30.ab4 Qb4 31.Qc7 Qb6 32.b4+-
A3)
28...Bd5 29.Qd4 Ka5 30.b4 Ka4 31.Rf6!+-
and more energetic B)
28.Qf7!?
, where White continues to attack retaining queens. For
example:
28...Rhf8 (28...Bd5 29.b4!!
(
mating net
)
29...Rb8
30.Qg7+-; 28...Ka5 29.Re6+-) 29.Qg7
with attack.
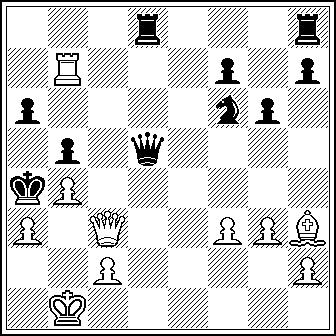
27.b4 Ka4 28.Qc3
The black king is in a terrible situation. Threatened is mate on
b3
.
28...Qd5
28...Bd5? 29.Kb2!
(
mating net
), and
Qb3
with mate is
inevitable.
29.Ra7 Bb7
Lost is
29...Rd6? 30.Kb2
, and the rook
d6
is
overworked
:
30...Qd4 31.Qd4 Rd4 32.Ra6#
30.Rb7
. Despite Black having an
extra rook, his king's location in
mating net
appeares to be decisive
for the position evaluation.

30...Qc4?!
Not saved is
30...Rd6 31.Rb6!!
("task" strike on the topic of
distraction
;
31.Ra7 Qc4) 31...Rb6 (31...Rhd8 32.Kb2
(again
overwork
!)
32...Qd4 33.Qd4+-) 32.Kb2
with idea
Qb3+-
.
Black would have had more chances to defence after
30...Rhe8!? 31.Rb6
Ra8
, for example: A)
32.Kb2 Qe5 (32...Re2)
. B)
32.Rf6 Qc4
33.Qc4 bc4 34.Bd7 Ka3 35.Be8 Re8 36.Ra6 Kb4=/+
C)
32.Be6!?
(
crossing
)
32...Re6 33.Re6 Qc4 (33...fe6? 34.Kb2+-) 34.Qc4 bc4
35.Rf6 Ka3
with an unclear ending. D)
32.Bf1!?
, taking the
c4
-square under control and threatening
33.Rd6!
(
distraction
). White continues to attack even without a rook.
31.Qf6 Ka3
Black king bravely moves ahead, towards his death. Now Black loses forcely.
After
31...Rd1 32.Kb2
he could change queens: A)
32...Qd4 33.Qd4
Rd4
, but it wouldn't have been the better fate -
34.Rf7 Rd6 (34...a5
35.Ra7+-; 34...Re8 35.Rf6 Ra8 36.Be6+-) 35.Re7!
with idea
Be6+-
.
B) Also in the case of
32...Ra8 33.Qb6 (33.Rf7 Rd2) 33...Qd4 (33...a5
34.Bd7 Rd5 35.Qe3+-) 34.Qd4 Rd4 35.Rf7 a5 36.Be6 ab4 37.Bb3 Ka5 38.ab4 Kb6
(38...Rb4 39.c3+) 39.Rh7+/-
Black couldn't escape.
32.Qa6 Kb4 33.c3!
And
attraction
, and
distraction
. Much worse was
33.Bd7 Rd7
34.Rd7 Rc8 35.Qd6 Rc5
with an unclear position.
33...Kc3
33...Qc3 34.Qb5 Ka3 35.Ra7+-; 33...Kc5 34.Rc7+-
34.Qa1! Kd2
34...Kb4 35.Qb2 Ka5 36.Qa3 Qa4 37.Ra7+-
35.Qb2 Kd1
35...Ke3 36.Re7 Kf3 37.Qg2#
36.Bf1!
Distraction
of queen from the defence of the
c2
-square and, at
the same time,
blockade
.
36...Rd2
Black
had accounted for this
counter-strike
. Of course, Black can't capture
the bishop:
36...Qf1 37.Qc2 Ke1 38.Re7+-
37.Rd7!
A decisive strike - on the topics of
pin
and
distraction
.
37...Rd7 38.Bc4 bc4
38...Re8 39.Qc1#
39.Qh8+- Rd3 40.Qa8 c3 41.Qa4 Ke1 42.f4 f5 43.Kc1 Rd2 44.Qa7
1-0


Shahcom Company, © 1999
